|
For you people who are handy with tools. I will show you step by step how to rebuild a spring piston air gun by replacing the main spring and the seal
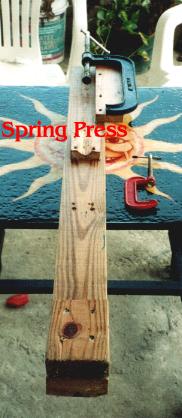
To replace a piston's spring (main spring) you will need a spring press. In the photo below you will see a spring press I built using a 8 inch C-Clamp. Notice that I cut the end of the C-Clamp and drilled 2 holes in it, to screw it to a 12 inch long, 3x1 inch thick piece of wood. I then screwed the C-Clamp and the board to a 45 inch long, 2x4 with 4, 3 inch screws. I also used a 4 inch piece of on the other end and screwed that down with 4, 4 inch screws, this end holds the point of the barrel. I also placed a 4 inch, 3x1 inch "V" groved piece of wood in middle, to secure the air gun to the press. After all was securely screwed down, I painted the spring press with a water based sealent, this will help in cleaning up grease and tar from the spring press
|
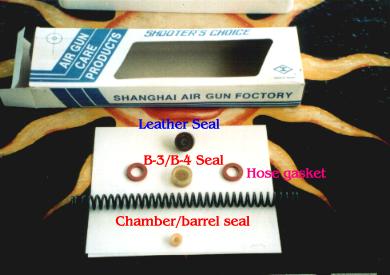
 Below you will see different types of piston seals.
The leather piston seals are often found in break barrel spring piston air guns, it comes with 2 sections of leather and a screw in the middle.
Below you will see different types of piston seals.
The leather piston seals are often found in break barrel spring piston air guns, it comes with 2 sections of leather and a screw in the middle.
The B-3/B-4 piston seal is a cup shaped silicone/rubber like material that is made for these models. It goes on top of the piston and covers the head of the piston. A air gun kit is sold that comes with spare parts, main spring, seal, cleaning rod with oil and the kit comes with these seals.
Notice I have placed 2 water hose gaskets, they are the rubber type gaskets that go inside a water hose. These rubber gaskets can be used as a piston seal, instead of the factory seal and only cost .10 cents at a Hardware store. They work fairly well. But do not cover the head of the piston to cushion the impact of the piston. Thus metal strikes metal with every shot and could damage the piston and the piston chamber with long use. I am doing a test to see if I can increase the speed on a B-3-1, by changing the seal to gain the space the top of the factory seal covered, about one fourth of a inch.
|
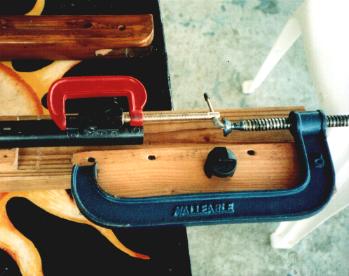
 Removing the 2 spring sliding cocking device in the B-3-1.
In the photo below, I have taken off the stock and I am using a 3 inch C-Clamp to release the pressure created by the 2 springs on the sliding cocking device. After taking off the pressure, I uncrewed the screw that held it in place and taking care that the springs do not pop out, I placed my other had on top of the device. If they pop out they can get lost and are hard to find
Removing the 2 spring sliding cocking device in the B-3-1.
In the photo below, I have taken off the stock and I am using a 3 inch C-Clamp to release the pressure created by the 2 springs on the sliding cocking device. After taking off the pressure, I uncrewed the screw that held it in place and taking care that the springs do not pop out, I placed my other had on top of the device. If they pop out they can get lost and are hard to find |
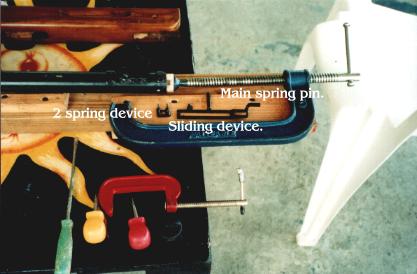
 Here I am releasing the pressure of the main spring.
In the photo below, I have released the pressure of the main spring using the 8 inch C-Clamp and I have taken out the main spring's pin using a pin punch. Once the pressure is release it comes out easily. I have also taken out the sliding device and the 2 spring cocking device. Then I took out the pins in the trigger assembly and I pulled the trigger assembly out side to be able to take out the main spring, the piston and it's pressure chamber.
Here I am releasing the pressure of the main spring.
In the photo below, I have released the pressure of the main spring using the 8 inch C-Clamp and I have taken out the main spring's pin using a pin punch. Once the pressure is release it comes out easily. I have also taken out the sliding device and the 2 spring cocking device. Then I took out the pins in the trigger assembly and I pulled the trigger assembly out side to be able to take out the main spring, the piston and it's pressure chamber. |
 The disassemble spring piston and chamber.
Now in the photo below we can see the main spring, the piston and it's pressure chamber disassembled. Notice the plastic spring holder on the right of the photo, from here came out the main springs holding pin. Also notice the piston, I have taken off the damaged seal and I have replaced it with a rubber water hose gasket. I stretched the rubber gasket over the head of the piston into the seal's holding slot of the piston's head. Then I tested it and I found that it was bigger than the chamber and it did not fit. So I sanded the rubber gasket's outer edge with a piece of 220 sand paper in a round motion, twisting the piston with the gasket on it to insure that it sanded evenly until it came to a tight fit in the pressure chamber. After insuring a tight fit, I placed a little of "Slick 50" motor oil treatment to the gasket and the chamber and it enter smoothly and easily in the chamber. If you have to replace the chamber's/barrel's seal, just pull it out with a small flat head screw driver and with your thumb push in the new one.
The disassemble spring piston and chamber.
Now in the photo below we can see the main spring, the piston and it's pressure chamber disassembled. Notice the plastic spring holder on the right of the photo, from here came out the main springs holding pin. Also notice the piston, I have taken off the damaged seal and I have replaced it with a rubber water hose gasket. I stretched the rubber gasket over the head of the piston into the seal's holding slot of the piston's head. Then I tested it and I found that it was bigger than the chamber and it did not fit. So I sanded the rubber gasket's outer edge with a piece of 220 sand paper in a round motion, twisting the piston with the gasket on it to insure that it sanded evenly until it came to a tight fit in the pressure chamber. After insuring a tight fit, I placed a little of "Slick 50" motor oil treatment to the gasket and the chamber and it enter smoothly and easily in the chamber. If you have to replace the chamber's/barrel's seal, just pull it out with a small flat head screw driver and with your thumb push in the new one. |
 Notice the old spring and the new spring
Notice I have placed the old and new spring together. You can see that the old main spring is shorter than the new main spring. It looks like this air gun was cocked for a long period of time and squeezed the main spring down and bent it a little. I has to be replaced.
Notice the old spring and the new spring
Notice I have placed the old and new spring together. You can see that the old main spring is shorter than the new main spring. It looks like this air gun was cocked for a long period of time and squeezed the main spring down and bent it a little. I has to be replaced.
Putting it back together is a reverse process, just remember how you took it apart and put it back together again.
The Test.
After we finished we tested this modified. 22 cal. B-3-1 and found that it shot faster (fps) than a new B-3-1, about 50 fps more. Anywhere from 750 fps to 800 fps. Remember, using a water hose gasket as a seal is not recommended, but it will give the rifle a little more power. But it might crack the piston's chamber with in time, after all it is metal against metal hammering away.
As I said I modified this B-3-1 as a test, later on I will replace the the water hose seal with the original seal before something happens to the chamber, but for now we are having loads of fun testing it
|
 Get super discount air guns above. And remember you don't need a credit card to order from us.
|
|
|
|

